
After creating hundreds of illustrations in Procreate I’ve found the best way to set up my canvas for sketching. I’ll show you the ideal canvas settings for sketching, illustrating, and printing. Here’s how to do it!
1. Hit the plus icon on the top left to bring up the canvas toolbar
Upon opening Procreate, hit the plus icon on the top left to get started. Here you can see some premade canvases. Any of these will do, but for full control, I’d suggest you pick your own settings.

2. Tap the small plus in the top left corner to create a custom canvas
Hitting the plus icon in the top left corner allows you to input your settings. You can also name your canvas. Simply tap ‘’Untitled-Canvas’’ and come up with the title of your next masterpiece. On the left side, you see 4 different tabs in which you can adjust your settings.

Dimensions
This is where you choose your width, height, and DPI. Keep in mind how you want to display your artwork. For example, I mainly post my art on Instagram. That’s why I usually go for Instagram’s portrait size: 1080x1350px. Scroll down to find a table that features each social media’s preferred canvas size.

What DPI should I pick in Procreate?
In Procreate, your canvas DPI should be set to 72 if your work will be digital-only. DPI stands for Dots Per Inch. To keep a good resolution for prints, your DPI should be increased to 300. Just note that increasing DPI will result in a lower amount of layers to work with. The number of layers will adjust accordingly. You can’t change them yourself.
Color profile

In the color profile tab, you can choose between RGB and CMYK. Choose RGB if you are not planning on printing your work. Choose CMYK if you are going to print your work. Just note that you can’t switch between the two once you’ve decided on one. In this article, I tell you how and when to use each: The difference between BYR, RGB, and CMYK explained
Below RGB and CMYK you see a list of different options. I don’t tinker with these. If you leave it in the default setting you should be fine. These settings have to do with how screens display their colors. If you’re interested in learning more, you should check out this link: What is a color profile?
Time-lapse settings

The cool thing about Procreate is that it automatically creates a time-lapse of your process. Here you can adjust the settings of the video, which yes, you can export once you’re done! The default settings are fine to capture your process with. Increasing the quality will also result in a bigger size file.
Canvas properties

Here you can choose your background color. This is the color you start with. You can change it any time you want in the layer panel once you’ve created your canvas. You can also choose to hide your background. This too you can change in your layer panel once you’ve created your canvas.
3. Hit ”Create” to start sketching
Once you hit create you are ready to go!

Best canvas dimensions for Procreate
The best canvas dimensions for Procreate are 1920 x 1080px and DPI set to 72. Of course, this depends on what you want to do with your artwork. If you create a canvas with 1920 x 1080px your canvas has an aspect ratio of 16:9 which means that your canvas will be full screen. Let’s see Procreate’s correct canvas dimensions!
Best Procreate canvas size for Instagram
Here are the correct canvas dimensions for Instagram:
| Type | Dimensions in pixels (with DPI set to 72) |
|---|---|
| Profile picture | 360 x 360px |
| Landscape post | 1080 x 566px |
| Square post | 1080 x 1080px |
| Portrait post | 1080 x 1350px |
| Story | 1080 x 1920px |
| Story highlights cover | 1080 x 1920px |
| IGTV cover | 420 x 654px |
Best Procreate canvas size for Facebook
Here are the correct canvas dimensions for Facebook:
| Type | Dimensions in pixels (with DPI set to 72) |
|---|---|
| Profile picture | 400 x 400px |
| Cover Profile | 1125 x 633px |
| Photo post | 1200 x 630px |
| Stories | 1080 x 1920px |
Best Procreate canvas size for Twitter
Here are the correct canvas dimensions for Twitter:
| Type | Dimensions in pixels (with DPI set to 72) |
|---|---|
| Profile picture | 400 x 400px |
| Post image | 1200 x 675px |
| Header | 1500 x 500px |
Best Procreate canvas size for print
Here are the most common canvas sizes for print. Note that your print company might have certain rules for printing. Visit their website to see their requirements for printing (e.g. adding a bleed area, how to deliver your file etc.).
| Type | Dimensions in pixels (with DPI set to 300) |
|---|---|
| A3 | 4961 x 3508px |
| A4 | 3508 x 2480px |
| A5 | 2480 x 1748px |
| A6 | 1748 x 1240 px |
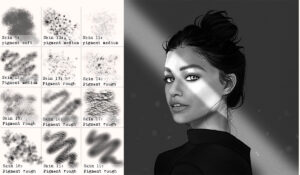
Best native sketch brushes in Procreate
You find Procreate’s native sketch brushes in the brush library. Tap the ”Sketching” tab to find them. Here’s a swatch of all of Procreate’s native sketch brushes:

Did you find your favorite yet? Mine is the 6B pencil. I love to use the hatching technique with it!
Free downloadable brushes for a paper texture look in Procreate
The one thing missing in a digital painting is the textured surface of your paper. But, you can fake it by using a textured paper-like brush or overlay an image of paper. Here you can download free paper images from a reliable source. And here you can download a free paper brush. Once you have downloaded either one, you can create your own paper textures in Procreate.
How to get a paper texture look in Procreate using a brush
- Download a free paper texture brush from a reliable source
- Set your background to a color of your liking
- Set your color picker to black
- Create a new layer
- Paint over this layer with your paper texture brush
- Set blend mode to multiply
- Change opacity if the texture looks too strong

Now you have a paper texture look! When you paint on new layers, you’ll notice that they are not affected by the paper look. You need to make sure that the texture is on top of your art. I usually finish my illustration and flatten my layers. Then I create a new layer and paint with my paper texture brush, and then I set the blend mode to multiply. Now my illustration looks like it was drawn on paper!
How to get a paper texture look in Procreate using an image

- Download a free paper texture image from a reliable source
- Import the texture into procreate and make sure it’s the top layer
- Change the blend mode to multiply (play with different blend modes to see what fits best)
- Change the opacity if the texture looks too strong
Which canvas changes can I make after creating a canvas?
Earlier I mentioned that you cannot change from RGB to CMYK and vice versa once you created your canvas. These are the settings you can change after creating your canvas:
- The name of your canvas
- Width and height of your canvas
- DPI
- Rotation of canvas
Here’s how you access and change the settings of your custom canvas:

- Hit the settings icon in the top left corner
- Go to canvas
- Hit Crop and Resize
- Tap Settings in the top right corner
Every time you create a new canvas there will be new options, like:
- Animation assist (allows you to draw on and playback your layers as if they were frames of an animation)
- Reference (to add a separate image to your canavs for reference!)
- The ability to flip your canavs horizontally and vertically
How to save a canvas in Procreate
Once you created a custom canvas Procreate will remember and save your canvas settings. You can access a new canvas with the same properties by:

- Tapping the plus icon in the top right corner
- Go to bottom of the list to see your latest created canvas
You don’t have to manually save each time you draw in Procreate. Procreate automatically saves any changes you make!
How to export a canvas in Procreate
You can export your canvas in Procreate by sharing it as a PSD or Procreate file.

- Go to the settings icon in the top left corner
- Hit share
- Save as PSD or Procreate file
Another option is to share your layers only as one of the following files:
- PNG files
- Animated GIF
- Animated PNG
- Animated MP4
- Animated HEVC
How to export artwork in Procreate
You can export your artwork in Procreate by

- Hit settings icon to bring up the settings interface
- Tap ”Share” to see the share options
- Pick your file of choice
- Hit save image to save your artwork to your photos
You can also directly email your artwork or send it through WeTransfer if your file is too large to email (over 25MB).
You can save your artwork as one of the following files:
- JPEG (most common and small file size)
- PNG (can include transparancy)
- TIFF (big file size but great for print since it stores a lot of data)
How to export video time-lapse in Procreate?
You can export a video time-lapse in Procreate by

- Go to settings
- Hit video
- Tap export Time-lapse video
- Choose full length or 30 seconds
- Hit save video for your video to be saved to your camera roll
That’s it! Super easy, right?
A fun way to use Procreate
Now that you know how to set up your canvas, Use Procreate and Cricut to Create Your Own T-Shirt Design!
I hope you just learned how easy it is to set up your canvas in Procreate! I’d love to see what you create. Connect with me on Instagram so I can see your beautiful artwork or leave a message in the comments down below to let me know if you found this article helpful :)
♡ Laura


Thank you for all that useful information but how do I export my Procreate art onto my instagram please?
Hi Anne, I usually save the artwork as a PNG or JPEG to my iPad. Then, I simply e-mail the saved image to myself, so I can open the image using the e-mail app on my phone. Then I save the image on my phone and I can upload it to Instagram! Hope this helps :)
Hi Laura! Thank you for this blog. This is really helpful. I just want to ask. What if you want an artwork for both print and for digital. I knew I should definitely use a higher dpi for printing. I just noticed that whenever I upload it on instagram it becomes blurry. Does it mean I should also set and save the image in a lower dpi separately? Thank you
Hey Janella, apologies for the late reply. When you upload an image that is a lot bigger than the recommended 1080 pixels Instagram will lower the quality tremendously (even more so than is actually needed it seems). I usually create a canvas with Instagram’s resolution (either 1080×1080 or 1080×1350) and then I add the saved image of the print version to my Instagram canvas and scale it appropriately. The resolution will always be worse. If you want to keep your high resolution you can also create an Artstation account which is where a lot of artists post their high-resolution artwork. They upload a lower resolution to Instagram and tell their followers they can find the high res on their ArtStation account. Hope this helps!